Showing posts with label frugal. Show all posts

Wednesday, May 22, 2013

Our 2013 Garden and Mini-Experiments (a.k.a. "Really Cool Tips!")

Hello! We have been busy busy little gardeners, doing what we can to coax our little seeds out of their respective shells. Our starts did beautifully in their mini greenhouse, and are now safely tucked in pots and buckets inside our little greenhouse. Speaking of my new greenhouse. I ADORE it! It has become my little, quiet oasis in the midst of summer noise and chaos.  It's nothing fancy;  just one of those little quick-set kits that we got 2 years ago when they were on end-of-season clearance. I paid a whopping $30 for it instead of the original $149 sticker (so very centsible of me, if I do say so myself!), and have been anxious to set it up since.  However, last year with a newborn and a record-setting rainfall, I wasn't feeling my green thumb groove, and the kit stayed in it's box. That's just made me garden with pent-up demand this year!

Farmer Boy has been diligently helping his Mama set up the greenhouse and fill the beds with all sorts of roots and leafy greens! I love that farmhand wanna-be!  :)

Ta-Da! Greenhouse up, ready, and planted! I have since modified it by inserting two patches of window screen just below the point of the roof on the short ends in order to vent the excess heat. I just cut  a rectangle out of the plastic cover and taped in the scraps of window screen using thick plastic tape (and duct tape when I ran out of clear plastic).
Farmer Boy has been anxious to move his pumpkin starts out of the living room and into the greenhouse. We had thought we would put them in a pallet, but the pallet was too wide for the floor of our little structure. So, into some big pots they went, and I'm sure we'll have to thin as they grow. I am thinking I will rest squares of plywood between the pots as they start to vine. I am really trying to keep them up and away from the slugs that always seem to enjoy them before we can. (sigh)

We also planted tomatoes, peppers, yellow squash, zucchini, and strawberries. Now I am left with one empty shelf and pondering how I can fill it?! Maybe more zucc's?
  Yay! I finally got to plant my heirloom tomato seeds that I had saved two seasons ago! At the time I had filed them away, I was a garden newbie and didn't realize that seeds should be planted the following year. I had completely forgotten about them until recently, so we'll see if I get anything! (Fingers crossed)

 One rain gutter on the deck that is sprouting Black Simpson lettuce and green onions.


This one is sporting French Breakfast radishes and more scallions.


Potato buckets on the back deck awaiting planting this weekend. (The spuds are still sprouting in the bathroom cabinet :)


A hazy shot of the beds. This year we added three pallets and removed one swimming pool.
We have spinach and kale in the pallets. Beets, carrots, onion, sugar snap peas, and snow peas are in the beds.


TIP ALERT! We wrapped our unsightly swimming pool garden with a scrap of burlap after finding the idea on-line. It looks SO  much better, and I'm sure the neighbors are thrilled. However, as you can see, I need to go visit my yard with the weed-eater this weekend!

The greenhouse addition! If you look closely under the peak of the roof, you can see the window screen patch I mentioned above. There is one on the opposing wall, as well,  to allow for air flow and venting.

Love Love LOVE my herb garden. Pesto and salsa are definitely on my summer menu!

TIP ALERT #2! What a great way to re-use old jar lids! Thanks Pinterest and Pinners for this handy tip!

I'm actually really pleased with my front door this year. I love the mixed containers and accessories that make up our whimsical fairy garden. You can also see the beautiful rocks that the children in my Farmer Jr's Sunday School class embellished and handed out to the congregation on Easter Sunday.


Well, that's what we've been up to our eyeballs in doing lately. We are pooped, but pleased! I can't wait until the harvest begins!

Blessings to you and your Homestead,
Hillary At Home

Monday, June 11, 2012

"Living Like The Impoverished"?!! LOLOL

Hello from the land of newborn cuddles and all-night feedings! Yes, I haven't blogged in FOREVER, but with the introduction of our newest bundle into this crazy family, the blog had to be put aside for awhile.  I was planning to gradually wade back into it since I have mentally composed countless entries during those 3 a.m. feedings, but after coming across the following tidbit, I decided to rush back into the blogging world full tilt.

Here is what has motivated me to pick up my virtual pen again. One of the local homeschool groups has a yahoo board for communicating among the local HS community.   The following text is the post that graced my inbox last night:

Our family is tossing around the idea that for the entire upcoming school year we will live as if we are impoverished. Exactly what that that means we haven't nailed down, but some examples might be:

1. Purchase only what is absolutely necessary

2. Purchase used clothing
3. Turn off our cable, maybe even the TV.
4. No cell phones for a year, only the land line
5. Ride bikes whenever possible

It would be great for other families to join us. Perhaps spend the year learning about other impoverished countries and cultures.


Maybe a weekly/bi-weekly get together. Sort of a support group.


Then, as a reward, at least for us, we are going to go to Europe for two weeks.

What in the world??  This person really thinks those 5 bullet points are impoverishment?! 

Okay, in an effort to maintain the positive attitude that I want this blog to exude, let me just tackle two of the many (I feel)  misguided items in this entry.  First off, I am going to re-paste the bullet list below with a comparison of our current lifestyle after each item.

1. Purchase only what is absolutely necessary  (That's what we do for the most part-especially when we have a specific savings goal in mind, i.e. paying off debt, saving to buy a house, retire, etc.)
 
2. Purchase used clothing (YES! The mark-up for new clothing is between 40-700%!  We buy used or heavily discounted.)
 
3. Turn off our cable, maybe even the TV.  (We have Netflix and Hulu for the Fall/Winter, but turn if off for Spring/Summer.)
 
4. No cell phones for a year, only the land line (Well, we do have pre-paid cell phones for those twice a week calls...)
 
5. Ride bikes whenever possible (Okay, you got me there. We live up the side of a mountain next to a busy highway, so we have opted not to send our kids careening downhill into traffic.)

Now I am not sure what the benchmark is for impoverishment according to these criteria, but since we pretty much qualify for 4 out of 5, I'm assuming this woman would consider us to be so -along with the majority of one-income homeschooling families for that matter!  

At one point in our life, I would agree that we were poor. We were so indebted and underwater financially, that we were seriously struggling. We were slaves to many lenders.  Thankfully, we are now free of those chains by choosing to live with such restrictions as listed above. The ironic thing is, that while we could now easily afford to go back to a more luxurious standard of living, we have chosen to keep our modest ways.  We have seen the numerous benefits of restraining our purchases, buying/receiving used goods, spending our time away from the TV screen, and not being assaulted by a constant barrage of phone beeps and rings. And yes, when we can, we like to load up the bikes, head to a bike path or side road, and pedal our hearts out.

Item #2:  "Then, as a reward, at least for us, we are going to go to Europe for two weeks."
This seems so wrong in so many ways! First off, does the family behind this post really see these changes as true impoverishment? Are they so out of touch with what real poverty looks like that they feel they deserve an exotic vacation as a reward for their self-imposed martyrdom? It's no wonder, then, that many peoples in the world view Americans as jaded, greedy pigs.

Since I firmly believe that how a person spends their money is simply a matter of what their financial priorities are, I can understand that a person's impression of wealth/poverty stems from a personal perspective. That being said, here is my own list of what words I would substitute for the word "impoverishment" based on my family's experiences and beliefs:

"Living within one's means"
"Living on a budget"
"Living simply"
"Being a wise steward" (Luke 12: 42)
"Not being a slave to a lender" (Proverbs 22:7)
"Being faithful with little to earn responsibility over more" (Luke 16:10, Matthew 25:23)
"Storing up treasure in Heaven" (Matthew 6:19-21)
"Freeing ourselves from the strongholds of materialism" (Mark 10: 17-27)
Rather than feeling impoverished and trapped, we are much more free and flexible than we ever were before. In fact, I would highly encourage this family to take on their project! I have a feeling they would benefit in many more ways than simply a trip to the Eurozone when it was over.

Blessings to you and your homestead,
Hillary At Home


Tuesday, November 22, 2011

Homestead Holidays-Our Thanksgiving Week Plans

Yes, I should have posted this by last week to give you a heads' up in case you were tempted to gather some of these great materials for yourself. All I can say is "I'm sorry", and hopefully you can still work some of these treasures into your Thanksgiving festivities and schooling.  So, here is the day-by-day plan for the Thanksgiving unit our family is enjoying this week. I pray you will enjoy them, too!
(side note: I put an asterisk * next to all the freebies)

Monday 
Story: Cranberry Thanksgivin
* Make Cranberry Sauce
* Read Ch 2-8 in Stories of The Pilgrims by Margaret B. Humphrey (read free online!) while coloring
Thanksgiving themed color pages
* Read the poem "Thanksgiving" by Lizella Moorer
* Sing "We Gather Together"

Tuesday
Story: Samuel Eaton's Day and Sarah Morton's Day (compare/contrast)
Illustrate the booklet for the poem "We Thank Thee" (and read the poem aloud!) found in Scripture Adventures' Give Thanks  download
*Sing "Count Your Blessings"
*Read ch.15-20 of Stories of the Pilgrims
Make Pies for Thursday's Feast!

Wednesday
Story: Turk and Runt (a hilarious family favorite-especially if you use different voices for the characters)
*Make Rocking Turkey craft from this free Thanksgiving Activity Pack
*Sing "Over The River And Through The Woods"
*Read ch. 26-30 of Stories Of the Pilgrims
*Watch "A Charlie Brown Thanksgiving" (a little bit of education in the second half, but this is more about the family tradtion!)
More food prep for the feast!

Thursday
Eat, give thanks, and read ch. 32 of Stories of the Pilgrims. Happy Thanksgiving!!

Be thankful in all circumstances, 
for this is God's will for you 
who belong to Christ Jesus.
1 Thess 5:18 NLT

Blessings,
Hillary At Home


Friday, August 26, 2011

Homestead Experiment #29-Homemade Cherry Pitter

One of my  favorite magazines is Seasons At Home published by Joyous Home Publishing.  Each whimsical issue is like a book filled with encouraging insights, and wonderful crafts, handiwork, and woodworking projects.  It helps me to regain perspective in regards to my mothering ministry, and it gives me ideas for developing life-skills in my children.  In the most recent issue there was a recipe for canned cherry pie filling.  When I saw cherries on sale at the store for 1.99 a pound (regularly $5-6), I knew I had to give it a try.

I happily loaded up my grocery cart with bags of cherries and headed over to the household department to pick up a cherry pitter. $15.99!?!  For a utensil I will use once a year?!  I was going to spend more on the pitter than on the cherries!  I dragged my bags back to their home on the produce shelf, but was resolved to research a homemade version of the pitter.  Thankfully I didn't have to look any further than youtube for a variety of options.  I saw everything from knife smashers to paper clips, but the design I settled on is featured in this video:

Just like the guys show in the clip, I was easily able to replicate their pitter with my own cheap forks and pliers.

Then came the test of being able to use it with ease. Sure enough, I was able to pit 6lbs. of cherries during my daughters' 30 minute rest-time.  Not too shabby, eh?


For a cost savings of roughly $15.75, I am extremely happy with the result. Thanks 'handsongourmet'!

Blessings,
Hillary At Home

Monday, June 27, 2011

Homestead Experiment #22-Homemade Recycle Bins

I would love to have these stacking bins to hold my recycling in between drop-offs. However, what I have are these:


Pros-We've been using these 18 gallon Sterlite totes for 4 years now, and they work just fine. Plus the three of them fit perfectly across the back hatch of my suburban.

Cons-They take up quite a bit of floorspace in our garage. Since we have the threat of bears digging through our trash in the spring/summer, I have to keep these indoors.

As you can see, the stacking totes make much more sense for indoor storage. However the downside to these is that they run $12.99 each locally! I just cannot bring myself to spend $40 on garbage holders!  Then, the other day as I was staring at my pitiful totes, I had an idea. Could I make my own stacking bins?

I went to the storage shed and dug out the lids to the totes. Yes, these were made of a fairly firm plastic that is not too flexible.  I got a sharpie and the tin-snips and went to work.

1) I put the lid on the tote and drew out an opening that included a few inches of the lid and a large round hole on the tote itself.


2) Using the tin-snips and some good ol' elbow grease, I cut the hole out of the plastic. I tried to make smooth cuts to avoid a jagged edge. I figured if it was too rough, I could wrap duct-tape around the edge. 


But no duct tape was needed! The edge is actually fairly smooth.

3) Repeat with the other totes and stack. I used the first piece I cut as a template to get a fairly uniform shape with the others.  If you perform this highly technical task with great precision you should have something like this:

Actually, it was not hard at all. It took me about 15 minutes, and more importantly, IT WORKED!! I love them! Yes, they aren't as polished as the pretty ones above, but they stack, they hold old soda bottles, and doing this reduced the bin's floorspace usage by 2/3! Woo Hoo!

Blessings to you and your homestead,
Hillary At Home

Friday, June 17, 2011

Homestead Success-My Father's Day Idea Completed!

Howdy everyone! I know I haven't written much at all lately (spring on the homestead after all!), but I quickly wanted to share my finished product with you all. I had blogged this idea for a Dad's day gift last month. I have mine finished and ready to go. I used Open Office to create this and am posting it via slideshare for you to see. This version doesn't include the fancy fades and formatting that my hubby will see on our computer with the office software, but you get the idea. It's not too late; if you haven't blessed the father figure in your life, give this a shot. It was a great reminder to me of how full and blessed my life really is.

A Tribute To Our Farmer

Blessings to you and your homestead,

Hillary At Home


Thursday, May 26, 2011

Homestead Experiment #21-Our FREE, Instant, Portable, Garden Beds

We are currently renting our wanna-be homestead. Since we found out we are going to be staying in this home for 4 more years, we wanted to expand our garden beds, but didn't want to invest in expensive lumber that we may have to tear apart, or give away down the road. So my wonderful hubby, Farmer Brent, went on line and found this great idea: upcycling old plastic kiddie pools into instant raised beds! Brilliant... except for one flaw: Those pools are bulky and as a result, cost a lot more to ship to Alaska than elsewhere in the lower 48. The pool I bought my 4 year old last year for $23 was the same size and shape of the one I had bought previously in Texas for $10.  This garden idea could be downright pricey; hence the experiment.

I decided to post 'wanted' messages on the local Juneauparents and Freecycle yahoo boards, as well as Craigslist.  As a result I ended up with 3 pool offers! I could only use 2, so had to pass on one.  People were thrilled to find out there was another use for their leaky, cracked pool, and I loved knowing I was keeping it out of the landfill while keeping my cash in my pocket! It's a win-win situation for sure!  Even better, one of the pools I was given was not only completely in tact, but was an upgrade from the plain ol' pool that we had for my daughter. This one had a slide, railing, and a drain plug!  Anyone who has tried to manually flip over one of these pools in order to empty it will appreciate my joy at a drain plug.  Obviously I decided to switch out her old pool for this better one.


Before I filled the pools with dirt, I punched holes all over the bottoms with a drill. It took me a whopping 2 minutes to do both pools.  Before I drilled holes in our old plain one, I had the kids test out the integrity of the new slide pool.  As you can see, they did a very thorough job.
It was a balmy 58 degrees that afternoon!
Yep, it'll hold. So I proceeded to drill away...
Little holes sporadically punched all over the bottom

Then, I simply put them in position, filled them with dirt, and began to plant. How easy is that? It might not be the most aesthetically pleasing garden bed, but I figured I could always run some little border fencing around to pretty it up. I probably won't bother, but knowing I could makes it better, doesn't it?
2 weeks later: Onions are sprouting!


If you are having a late start in getting your garden growing this year, I hope this will give you a kick start and maybe even a little inspiration.  Do not overlook the great resources that are found in your local yahoo groups and wanted boards. They can be a trove of free, or discounted, treasures for your homestead!

Blessings,
Hillary At Home

Monday, May 23, 2011

A Centsible Revision-My NEW Detergent Recipes!

Yes folks, I am making a Centsible revision!  In my classes I have shared my favorite dishwasher and laundry detergent recipes, but my hubby has stumbled across an ingredient that has blown the other two recipes away!  In order to post this, I needed to conduct a thorough experiment with an actual controlled test. I think you will be shocked and excited by what you see. In fact, I will go so far as to wager that this new recipe will far outdo any commercially made detergent on the market!  Read further to see why...

First, a brief history lesson.  There is an ingredient that used to be in most every detergent produced. It is still used as a cleaner, lawn fertilizer, and food additive. It's called Tri Sodium Phosphate (or TSP).  From what I gather, its alkaline character enables it to act as an saponifying agent that boosts your soap's cleaning power.  It was outlawed for home detergent use by the EPAs because there was a theory that the phosphates were contributing to algae blooms in some rivers and creeks in two counties in Washington. It wasn't ever completely proven, but the EPA has basically allowed everyone to continue to use it on the commercial level, but has banned it from the homemaking consumer (except in your cereal that your consuming. Hello? it's bad for rivers, but we can eat it anyway??)  Besides, they still haven't proven that the algae is even a problem in the first place!  And, my husband has another point to ponder. What about flouride? Many people intentionally put flouride in their drinking water supply, and it is derived from phosphate fertilizers!  Could there be a link there?  Ah, but I digress...back to TSP...

My hubby first found out about TSP while reading this article regarding one man's quest to bring back whiter whites and clearer glasses.  Inspired, my man gallantly drove to the hardware store and brought back this:
A nice carton of TSP, all for me!

It was time for a test. First off, he decided to remix my dishwasher detergent. We had begun getting some hard water type film on my water glasses and measuring cups.  Since the recommend use is 1/2 tsp per Tablespoon (3 tsp)  of detergent, we knew that the ratio is 1:6, TSP:Detergent.  He mixed the dishwasher soap recipe as follows:

2 cups Borax
2 cups washing soda
2/3 cup TSP
Use 1 heaping Tbsp per load.

The result? While it was hard to measure the effect, let me just say the appearance after just one wash was marked. It's taken a few washings to fully get rid of the film, but my glasses look cleaner than they have in a long time-even before I started using homemade detergent!  And I have quit adding vinegar to the rinse-aid compartment altogether, not to mention that my dishwasher itself also looks spiffy and clean!

Now for the laundry soap:

I decided to do a more controlled experiment for this stage. Since I needed to make up more detergent anyway, it was a great time to give it a whirl. I gathered two white, 100% cotton, men's undershirts that were in like-new condition.  I laid them on my dining room table to be my specimens.  I mixed my laundry soap as stated in my original centsible handout. However, after mixing in the gallon of hot water to the soapy mixture, I extracted 2 Tbsp. for my control group.  Then I mixed in 1/3 cup of TSP to the rest of the hot solution (I figured the ratio as 1/3c TSP: 2.5c other soaps.) This will be my new test group.  While the detergent cooled and set, I went back to the shirts.

On each shirt I painted 1 Tbsp of Heinz orginal ketchup with a basting brush.


I let it set for 5 minutes and then took the first shirt to launder. This would be laundered with the old soap recipe. I put it on a small load setting, with warm water (since that's how I usually wash my lights/whites. Our glaciel water is truly COLD!), and on 'Heavy' setting for about a 20 minute cycle.  After it was finished, I set it aside and did the same with the TSP test shirt. Note, that the TSP shirt had actually sat for 20 minutes longer since I only have one washer. If the results were sketchy, I figured I would repeat the whole process in the reverse order. I think you'll see that is not necessary.  Here is the end result:
The shirt on top is the control/old recipe shirt. The one on bottom is the TSP test shirt.  To help the results show better, I did a saturation effect on the same photo:
While the stain is still there in the TSP test shirt below, it is an obvious improvement over the control/old recipe shirt!  And that was without using any pre-treatment like Spray 'N Wash!  In addition, do not forget that the TSP shirt sat for 20 minutes longer.  Are you a believer now?! I sure am!  So for the record, here is my new laundry detergent recipe:

1 cup borax
1 cup washing soda
1/3 cup TSP
1/2 cup of grated bar soap
Melt the grated bar soap in 2 cups of water in a saucepan on the stove.  When melted, pour into a clean container and quickly stir in the borax, washing soda and TSP.  When thoroughly mixed, pour in 1 gallon of HOT water. Stir to combine and then let set. It will gel. In fact with the TSP, it gels even more firmly!

Now what about the Centsibility factor? While my husband paid almost $9 for our 4 lb carton, you can buy it by the individual pound as well. The average price seems to be $2-3/ lb on places like amazon.com.   As I mentioned before, it is pretty much available at any hardware or plumbing store, so shop around for your best deal.  One cup equals about 1 lb, so between re-mixing the dish soap and laundry soap, we have used 1 lb out of the 4 in the carton.  That means that it does add roughly $2 more to the dish soap and $1 more to the cost of the batch of laundry soap. Still this is much cheaper than pre-made laundry detergent!  If we add the $1 to the figures in the orignal centsible handout, we are looking at $2.25/70 loads which works out to .03/load!  You may be able to score the generic or super coupon detergent for that price, but since they are not allowed to put TSP in it, you will not have cleaning power of this recipe!  Remember also that people who are 'in the know' about TSP are buying pre-made cleaners at retail price and then adding in TSP as a booster! This way of doing it is MUCH more centsible than that!

Additionally, while I have been typing this, I re-washed both shirts in the new detergent with a spray n' wash pretreatment in warm water. Now the spot appears to be completely out of both shirts! Hooray!

**Keep in mind that I jokingly reference above that TSP is currently being used as a food additive/preservative-which it is! However, in the cleaning powder form, it is not edible and needs to be treated as a toxic cleaner.  Also, be sure to research if TSP affects being able to use this recipe with front-loading washers. Be reasonable and safe, and clean away... :)

Blessings to you and your sparkling homestead,
Hillary At Home

Tuesday, May 17, 2011

Homestead Idea-A Father's Day Gift He Will Treasure

Occasionally my wonderful husband drops by my blog, so I'm praying he doesn't this time! I don't want him to see what his Fathers' Day gift will be this year!

Have you ever heard any of the music by the Serene & Pearl of the Above Rubies ministry?  Let me just say I LOVE their music. It is wonderfully encouraging, quality music with beautiful melodies and lovely harmonies.  It's generally a mellow, soft pop sound, and you will find their music playing in the background during any given afternoon in our home.  I first purchased the mp3 download of their 'Best of...' album last year and have played it over and over.  For Mothers' Day, the ministry was running a stellar special on their CD's so I finally got to add some variety to my collection. In fact, the CD's just arrived in the mail today, so it's like Christmas for me! Okay, back to the gift... One of the mp3's I had previously downloaded is entitled First Word, and is a sweet song from a daughter to her father.  It is actually sung by Pearl's daughter Meadow, so it has that angelic, innocent sound of a young girl.  You can view the lyrics and hear a sample here.  Just scroll down to that song.

So, how does this all fit into a gift for my hubby? Well, I am planning to put together a photo slide show with pictures of my kids and their Daddy over the past 8 years, and set it to that song as the backdrop! Sweet, huh?  I think he'll love it. If you would like to do something similar but you're not sure how, just google 'Add music to presentation with____________" and fill in your software in the blank (i.e. Open Office, Microsoft Power Point, etc).  You'll get an assortment of forums and tutorials that show you the steps.

This is an inexpensive gift that is sure to be cherished and remembered far and above any neckties! And again, I cannot encourage you enough to treat yourself to the songs by Serene Allison and Pearl Barrett. They have brought me focus and comfort during those sometimes frazzling days of being a wife and mother.

Blessings to you and yours,
Hillary At Home

Friday, May 13, 2011

A Centsible Tip-Did you get your Fred Meyer's Rebate Yet?

If you live in the Pacific Northwest, you may have received your Fred Meyer's Rewards this week.  If so, I recommend either spending it right away or holding onto it for a couple of weeks. You're probably wondering why I would say this. Well, this week is the Founders' Day sale at the store and they are running great deals on a lot of household and grocery items. If there's something on sale that you were already planning to buy, then use your rebates and go for it. If not, then I recommend holding onto them until the end of this month when they have their big Memorial Day sale. If you view your rebates/coupons as money, then you'll understand that you will have much more purchasing power with those little bits of paper! 

In the fall, I hold onto my September rebate until Black Friday (the day after Thanksgiving). I can get a lot more with that '20% off Women's Apparel' coupon when most of their women's clothing is already 40-60% off!  Usually there are additional bonus coupons for money off my total purchase as well.  While I'm not a very avid couponer, holding your store rebates/rewards for major sales is definitely worth the patience.  As with any cash or coupon,be sure to keep it in a designated spot that you'll remember so that when you go to use it, you can find it!

Have a wonderful weekend!
Blessings,
Hillary At Home

Monday, May 9, 2011

Homestead Baby Gift-Hooded Towels

One of my favorite baby gifts to give and receive (!) are hooded towels. I'm not talking about the little infant ones that are paper thin and only fit for a few months, but rather the nice big roomy ones that still fit my soon-to-be 5 year old's noggin.  While these are a little too roomy for a newborn, you will get plenty of use out of them during the toddler and preschool years of their lives.  Since they are such a long-term gift, I especially enjoy giving them as gifts to parents with multiple children. They may not fit the infant right now, but could surely be used with big brother or sister in the mean-time!   Thankfully they are very easy and quick to make; my favorite kind of project!


What you'll need:
A large bath towel, A coordinating Hand-towel, and thread.  That's it!

Now, for the steps:
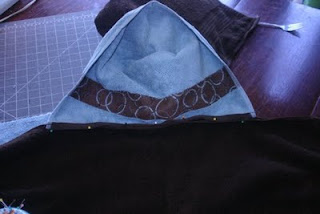
1) Cut the hand towel in half across the short width of the towel.

2) Take one of the new halves and fold in half again with the cut edge on top. Pin the cut edge closed.

3) Zig zag this closed. Open it back up and you'll see the 'hood' of the towel.

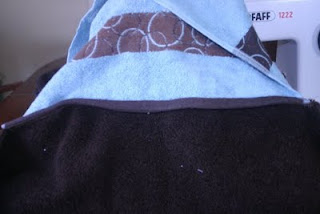
4) Attach the open end of your hood to the middle of the long-side of the bath towel. Voila!  You're all done, and your child will be dry and cozy.
Pin..
...then stitch.

And now good news!  Since you only use half of your hand-towel, you can actually make 2 hooded towels out of it (just buy one more bath-towel).  I made both of these towels in under 15 minutes, but the family can use them for years to come.

Other Variations:
-Run elastic along the inside top of the hood to make it more fitted.

-Use a wash-rag folded in half instead of a hand-towel for a smaller hood that will fit an infant.

-Applique other fabric scraps on it to make an animal face on the hood.  I actually got that idea from an old ducky-towel pattern in a Martha Stewart Baby magazine a few years ago. I can't find that exact one on-line, so here's another link to give you an idea of something similar.

Have fun with this!  You could be as creative as your imagination (and time) allows!
Blessings to you and all the little bundles of joy on your homestead,
Hillary At Home

Tuesday, May 3, 2011

Homestead Experiment #18-Our Free Chicken Coop (Update)

Wow! Our chicken coop has been prepped, pieced, and painted (somewhat) and now it is a freestanding structure! Woo Hoo!!  We still need to add the nesting box, grind off some long bolts, add a door, handles, caulk and more paint, but so far, so good! I sincerely thank the Lord for that!
So what about the "free" part of the experiment? Well, we are off to a good start. Along with all the free lumber and supplies I listed in the last post, we also scored free exterior paint (Benjamin Moore no less!) from the 'dead paint' wall of our local paint store. I had asked via local yahoo boards for leftover remnants people might have, and some participants pointed me in the direction of this paint treasure trove. It just goes to show it doesn't hurt to ask!  As you can see in the pics below, we were able to get the red and white barn look that we were after. Hooray!

We also found a free doggie door frame attached to an exterior door I had received for another project down the line. With a scrap piece of luan, we will have a great door to secure our hens.

Where did our budget get off track? Well, let's just say I never thought I would spend over $100 in nuts and bolts! Actually, we also bought hinges, handles, clips, and many boxes of screws for that. Still, out of all we had to buy, none of it was lumber; it has been all hardware! I admit, I am somewhat sad that we didn't get to make it for free like I had hoped.  However (!) in all those home decorating shows where they claim they can "....make over an entire room for $___..."  they do not include the cost of hardware, sandpaper, and painting supplies. So, that being said, our coop would still be considered 'free' by their standards. I just think that's really manipulating the truth.  ;P

So, here are a few pictures of our hardworking construction crew on the job.  I hope you enjoy! Be sure to check back for more updates as we near completion.
Rolling on the brown base coat before the red.

Next coat! Hint: Let the kids roll with a 'trim' roller. It takes longer but gives them more control.
Joining two of the closet doors together to make one long wall on the a-frame.

Have you ever seen the inside of a hollow-core door? It's basically very thin sheets with horizontal slats running the width of it.  Here you can see the gaps stuffed with paper to help them show up better.
We used salvaged rubber sheeting to cut wide strips to wrap and staple around the cut edges. This will also help make a gasket between the walls.

We added a 2x4 to each end of the pallet. This is what we will use to initially attach the end walls.
My handyman attaching walls to pallet.
3 walls up!
Attaching the side with the hinged door. This will be our point of entry to clean the coop.  My hubby is 6'1", so you can see the relative height of the building.  It is roughly 60" at it's peak.  We will actually be resting it on salvaged tires to elevate it for drainage.

Hinged door.  You can see that the rain started to fall as we were wrapping up for the day. Phew!

Next step: Installing the nesting boxes on this end...

Blessings,
Hillary At Home