Showing posts with label Cooking and Canning. Show all posts

Monday, December 12, 2011

Homestead Experiment #31-Canning Chicken For Christmas?

I have had several packages of chicken breasts and thighs hogging space in my freezer until I could get a chance to try canning them.  With the holidays approaching I decided that now would be a good time to free up freezer space for turkeys and hams-as well as to get ready for the HUGE chicken sale that is sure to follow Christmas. Did you see my post about that last year?  If not, be sure to check it out. It is worth noting so that you can observe whether this will be the case in your own area.

Okay, back to the canning. I read several recipes like this one, and watched a multitude of youtube videos like this one and this one to learn how.  It seemed pretty straightforward enough-especially since I've already canned salmon and hamburger. However, what I didn't like was the idea of putting a set amount of salt and bouillon into each jar regardless of how much liquid you did/did not end up adding. Because of air pockets in between the pieces of meat, you could end up adding varying amounts, and I was afraid that a full cube of bouillon (which is supposed to accompany a cup of water) would be too concentrated. Yes, I know that the chicken would release it's own juices as well, but I wanted to be a little more precise (okay, controlling) about the endeavor.  So, here is what I did:

I gathered my chicken, cutting utensils, clean jars, bouillon powder, measuring cup and spoons, and set to work cutting my chicken into strips to pack into jars. I liked the idea of having it in strips to go over pasta or in salads. I can always chunk it smaller or shred it later.
Next, I started with one cup of water in my measuring cup. I poured as much in as I could to allow a 3/4" headspace. Then I used my trusty wooden chopstick to work out any air bubbles so I could make sure that as much of the airspace was filled with meat or liquid as possible. (Now some of the resources I checked said to add broth or water, and some said not to. Since my experience with canning fish is that it does make its own liquid, I do not know that I would mess with it in the future. I wanted to do it this round mainly because I wanted to know how much seasoning to add in general.)
As you can see from this cup, I only added about 1/3c. of my water which means that 1 full bouillon cube or 1 tsp. of salt would make for a pretty salty jar of chicken.  By doing it this way, I only added about 1/2 tsp. of the powdered bouillon (adding a bit more than 1/3 to account for the chicken juices).  So, now in the future I know that even without any liquid at all, I will still only add about 1/2 tsp of seasonings to make a broth with the juices.

After this step, I wiped the rims, applied my sterilized lids and rings, and pressure canned the sealed jars at 10 lbs for 90 minutes (while finishing up a knitting project as I waited :).  After it was all done, I expected it to look like pretty strips floating in yellow-y chicken broth. What I got was this:
I got jars of white meat floating in greasy looking broth-much like the canned halibut a friend gave me. I guess I better be sure to label these to avoid any mix-ups!  So, while it isn't as visually appealing as I had hoped, it has been so nice to have these on hand. I have added it to fettucine before topping with alfredo, as well as adding it into fried rice for added protein.  How handy to know I have it ready for soups, salad topping, enchiladas, or for making chicken salad sandwiches. Yum!

What kind of meat or other items have you canned on your homestead? Any tips to share?

Blessings,
Hillary At Home

PS-Do not forget about that sale the week after Christmas. You can get lots of inexpensive 'specimens' to experiment with in your canner!

Saturday, September 3, 2011

Wow! An Egg-cellent comparison!

Alright, sorry for the corny pun. I couldn't resist.  But seriously, check this out:


My friends in North Carolina posted this picture on their facebook page along with the heading, "Are eggs from free range, organically fed chickens different than those you buy in the store? You be the judge. Free range eggs are on the left."    I was so impressed by the clear comparison, I asked to post it here for all of those naysayers who give me a hard time about getting chickens.  (Finger wagging here.)  It's pretty incredible to see the difference. I can hardly wait for my little hens to get to layin'!

Blessings to you and your homestead!
Hillary At Home

Friday, August 26, 2011

Homestead Experiment #29-Homemade Cherry Pitter

One of my  favorite magazines is Seasons At Home published by Joyous Home Publishing.  Each whimsical issue is like a book filled with encouraging insights, and wonderful crafts, handiwork, and woodworking projects.  It helps me to regain perspective in regards to my mothering ministry, and it gives me ideas for developing life-skills in my children.  In the most recent issue there was a recipe for canned cherry pie filling.  When I saw cherries on sale at the store for 1.99 a pound (regularly $5-6), I knew I had to give it a try.

I happily loaded up my grocery cart with bags of cherries and headed over to the household department to pick up a cherry pitter. $15.99!?!  For a utensil I will use once a year?!  I was going to spend more on the pitter than on the cherries!  I dragged my bags back to their home on the produce shelf, but was resolved to research a homemade version of the pitter.  Thankfully I didn't have to look any further than youtube for a variety of options.  I saw everything from knife smashers to paper clips, but the design I settled on is featured in this video:

Just like the guys show in the clip, I was easily able to replicate their pitter with my own cheap forks and pliers.

Then came the test of being able to use it with ease. Sure enough, I was able to pit 6lbs. of cherries during my daughters' 30 minute rest-time.  Not too shabby, eh?


For a cost savings of roughly $15.75, I am extremely happy with the result. Thanks 'handsongourmet'!

Blessings,
Hillary At Home

Monday, August 8, 2011

Homestead Experiment #28-All Alaskans Drop What You're Doing...

...and go get some Fireweed before it's gone!  Seriously. About 8 cups worth of blossoms to be exact.  Why? For amazng Fireweed Jelly of course!  We made a second (much more successful!) attempt at making Fireweed Honey in HE #25, but wanted to try something entirely new.  This jelly was such a victorious event that it may even knock my precious Salmonberry Jelly out of my #1 fave jelly spot. It's that good!  Plus it's much quicker and easier to get/make than Salmonberry.  If you can pick flowers and boil water, you can make this jelly!
Add caption


Here's the recipe I found:
  
Marylin's Fireweed Jelly Recipe
8 Cups fireweed blossoms
1/4 Cup lemon juice
4 1/2 Cups water
2 pkgs Sure Jell (or other powdered pectin)
5 Cups sugar

Pick,wash, and measure fireweed blossoms (flower part only, no stems). Add lemon juice and 4 1/2c water. Boil 10 minutes and strain. Take the strained juice and heat to lukewarm. (Mine was still very hot after straining, so I just went straight to the pectin. No need to cool it to lukewarm or anything.  I think that step is for if you leave a gap of time in between the straining and pectin and need to reheat the juice.) Add pectin all at once and bring to a boil. Add 5 cups sugar and return to full boil.
Boil hard for 1 minute. Pour into hot clean jars , wipe rims, and seal w/ lids and rings. Process in boiling water bath for 10 minutes.

My sous chefs assembling the ingredients

7 jars in and ready for a bath!

This is my little 'half-bath' canner that my sister brought me from Oregon. It's actually a vintage pressure canner. (see the flipped up latches on the lid?).  It has a little rack in it, and is perfect for half-pint and pint jars. I can totally understand how people used to have explosions pressure cooking with these, now that I've seen how thin the aluminum is and how there is no way to regulate the pressure. Yikes!  It's great for a non-pressurized water bath, but scary for anything else :S

The result:  it set up immediately and is a beautiful dark violet color.  That struck me as interesting since I was expecting it to be golden or light pink like other floral jellies I have had. Nope, the blossoms leached all their color during boiling.  As to the taste? Well, how do I describe it? It's as if you took cranberry juice from the store shelf and sweetened it a bit and then made jelly from it. It's not super floral-y tasting; more fruity tasting.  It's a little tart but not as tart as local cranberry jelly I have tasted in the past.  it's really just a lovely, full flavor without any bitterness.

Since my kiddos helped me pick the blooms and make the jelly, they were triumphantly parading around the dining room like a bunch of crowing roosters.  in fact they loved it so much (homestead confession here) they were apalled I was going to throw away the foam I'd skimmed off the top! I finally agreed to put it in a jar in the fridge for them to eat like jelly. We promised to only serve the pretty jars to company. :P

Note: 8 cups of blossoms is exactly what I ended up with after picking a large stockpot full of clusters from the top of the stems.  Because I needed the pot, I ended up dumping the contents into a plastic shopping bag. So now I can confidently say that the same amount of clusters tightly filled a Fred Meyer shopping bag as well.  Pick your container of choice, but err on the side of picking too many clusters rather than too few.

So, get out there and quickly get your flowers. I don't know about the rest of the state, but the fireweed in Juneau is about a week shy of going to seed.

Blessings,
Hillary At Home

Homestead Experiment #27-Watermelon PIckles


Here's a tasty tidbit for you. Do you know how to pick a good watermelon?  Well, I got it from my sister-in-law who got it from  a watermelon farmer that the trick is to look for the big yellow spot. The bigger and yellow-er the better.  That means that the melon has sat on the vine to ripen a good long time. She passed that trick along to me a few years ago, and I've never picked a blah melon since!  But I just can't leave well enough alone. I just have to take that juicy melon and do an experiment with it!

I remember reading about watermelon pickles in pioneer-themed books and have seen them referred to in southern magazines, but didn't think about trying to make them myself until I ran across the recipe in one of my homesteading books. I couldn't resist. I HAD to try to make them!  It would be a great project for the whole family to get in on, and if they were good, they could be the ideal pickling recipe since I don't seem to have too many cucumbers growing on my vines...yet... So, where to start?

I got a medium sized watermelon.  I painstakingly cut all the pink meat off the rind and cut the green peel off the outside. All I had left were strips of the white "Don't-eat-that-it-will-give-you-a-stomach ache" rind.  Yep, that's right. You're pickling the taboo part of the melon slice that is normally the stopping point when you're chowing down.  How cool, and yet how odd, to think that someone actually thought of pickling that...

Now the recipe we had calls for 6lbs of rind.  I thought for sure this melon would have that, but my kitchen scale revealed that we ended up with a little more than half of the required amount. Thus, I had to do some tweaking to the recipe and this is what we ended up with:

3lb white watermelon rind
1/3c and 1 Tbsp salt
2 qt water
1 tray ice cubes
4 1/2c sugar
1 1/2c white vinegar
1 1/2 tsp whole cloves
3-1" pieces of cinnamon stick
1 lemon, sliced thin

Cut the rind into 1" squares. I mistakenly thought that if the hard green peel was cut off, it would be easy for my kids to cut the rind with safety or butter knives. Unfortunately that was not the case. We soon had to break out the steak knives for the older two and my younger just kept sawing away with her butter knife.
My diligent rind-cutting crew

Great side benefit of the job: All the watermelon you can eat!

Dissolve salt in 2 qt water.  Add ice and pour over melon. Let stand for 5-6 hours.  Drain and rinse.
Okay, so I missed a little bit of the pink, but overall it's lookin' good

Cover with cold water and simmer until fork tender (about 10 minutes).  Drain and set aside.  In another pot combine sugar, vinegar, and 1 1/2 c water.  Put cloves and cinn. sticks in a spice bag and place in pot. Boil and stir for 5 minutes. Pour over rind. Add lemon slices and marinate overnight.
Babytoes, the syrup maker

Bubba, the syrup ladle-r
Boil rind in syrup until translucent (about 10 minutes). Pack jars leaving 1/2" headspace.  Add cinnamon stick from spice bag (1 in each jar). Process in water bath for 10 minutes.

Looks 'translucent' to me!


3 1/2 pints later...

The Result:  Well, hmmm. It wasn't as family friendly of a cooking process as I had hoped. The rind was tougher and it took awhile to cut, but overall it was a fairly simple project to do.  As to the taste, if you like sweet and sour pickles you should like this recipe. The rind has a nice firm texture like a cuke and it pickled well. My kids all liked them a lot. However I don't care for that flavor of pickle as much, so I just tolerate these. My husband actually detests sweet and sour pickles, so naturally he spit this one out in the grass. LOL  Well, I guess that I will start working on a dill version for an experiment next summer!

I hope you have gotten to enjoy some watermelon in one form or another this summer! I think I will just stick to triangle wedges with pink juice dripping down my chin!  :-)

Blessings,
Hillary At Home

Monday, July 18, 2011

Goldilocks Finds Her Honey! HE#25


Up in my neck of the woods, we have a beautiful flower called Fireweed. It derives its name from being one of the first living things to sprout up after a wildfire. Local lore also heralds it as the 'beginning of the end'-of the summer season, that is. When a fireweed goes to seed in August, the white fluff blowing around is definitely a reminder that snow is only a short time away...However, while it's still in bloom, we can enjoy its beauty as well as its taste!  There are many recipes for fireweed jellies, and wines. What I was after in this experiment was the perfect recipe for fireweed  honey (sometimes called "Homestead Honey").

This is not a true honey in that it is not poured from a honeycomb, and it is cooked. However, the end product is so honey-ish that I completely understand the reasoning behind the name. I cook with it and use it just as regular honey without issue.  When my intrepid niece was here two years ago from the far away land of South Texas, we attempted to make the honey using this recipe:

45 pink clover blossoms
25 white clover blossoms
100 fireweed blossoms
1 tsp. alum
10 Cups sugar
2 Cups water

Wash blooms in cold water. Put all ingredients except water into pan, then add water. Let sit for 10 minutes. Bring to a boil and boil until fireweed turns gray and water is a purple color. Strain through cheesecloth or jelly bag. Put in clean canning jars and water bath process for 10 minutes.

The result: My family agreed that it was too thick (had to microwave it to get it out of the jar), and too flowery tasting. I was still able to use it in my bread recipes without fail, but it was impossible to drizzle into tea. Bummer.

This year I impulsively decided to give it another go. I happened to be driving on a backroad and found a city lot that contained all three floral ingredients in one small area.   When I saw that, I couldn't resist the urge. I rapidly parked my suburban by the side of the roadway, and the kids and I piled out to gather blossoms.  (I just wish I would have had my camera to take pictures of the fun, but oh well, I was too busy herding and picking anyway!)

I knew I did not want to repeat the previous recipe and hunted the web for another version. I found the following recipe and decided to thin it down by adding an extra 1/2c of water.
 Would it be too runny? Would it still be too floral tasting?  Or would it be "just right"?

50 pink clover blooms
10 white clover blooms
18 - 25 fireweed blooms
3/4 tsp alum
5 pound bag white sugar
3 Cups boiling water  (I made it using 3 1/2 cups)

Wash blooms in cold water (gently rinse) to remove little critters. While rinsing blooms, boil water. Put all ingredients except water in pan, then pour boiling water on. Let sit for 10 minutes. Bring to boil and boil for 10 minutes. Strain through cheesecloth or jelly bag.
Put in clean canning jars and water bath process for 10 min.


The result: Success! It is a great consistency and the taste is not overpowering. It still has a hint of the unique flavor without making me feel like I'm drinking soap. It is thin enough to pour and drizzle while still being a thicker gel.


Three batches later, I am feeling pretty confident about this year's honey supply.  And this is a great recipe in which to involve small children.  There were no squished berries, stains, or scratches from thorny bushes.  Next up:  fireweed jelly!


Blessings to you and your homestead,
Hillary At Home

Thursday, July 7, 2011

Homestead Experiment #24-Dehydrating To Save Space?

Pineapples sliced, diced, and ready to dry!

I was so excited when I found my dehydrator last fall at the local Salvation Army for $10 new in the box! It is a Nesco FD-61 with round, stacking trays. It came with four trays but a person can add up to 12 total.  Great!  Except a pack of 2 trays runs another $20-30.  $100 for 8 more trays?!  Not so great.  Thus, you can imagine my prepping exuberance when I found a similar dehydrator at a garage sale for $2 !  It doesn't have the temperature controls, so it's kind of a dumbed-down model of my first one, but I didn't care. It had trays! For $2, I got 4 more trays to add to my original one-plus, I now had a back-up dehydrator that I could use as needed or lend out to friends.  Thank you Lord!  Now I need to keep my eye out for the last 4 trays to reach my limit of 12...

After getting my first dehydrator I had played around with making 'banana gummies' (bananas don't really dry into chips without lots of chemical intervention, or so I've been told), and dried some herbs and bell peppers.  For our food storage I've mainly stuck with canning our own fruits and buying pre-canned from the store, but my pantry is getting a little crowded, and all those jars are crammed in quite snugly.  Now, I knew dehydrating is good for storing food that cannot be canned using conventional methods, but I began to wonder if it was worth dehydrating some food to increase my storage capability.  (This may seem like a no-brainer to many of you seasoned preppers, but remember, I'm still experimenting with these things.) Thus Experiment #23 was born: Could I take a small mountain of fruit and reduce it's storage size to 1/3 of its original size?

This was the fruit I decided to start with.  I mainly chose it because it was a good price when I swung through my local Costco store.  After buying this, I also added in three pineapples and 6 pints of raspberries, so just envision those in that space between the pears and oranges. I wish I would have taken a picture of those so that I could do a little photoshop job in there, but oh well.

With all 8 trays going on the unit, it took me about a week to dry all of the fruit. However, due to our recent scare with a night-time fire at our home, I did not run the dehydrator at night while we were sleeping, or while we were gone.  (Note: The fire had nothing to do with small appliances, but I'm still scarred and do not wish to repeat it in any manner!)  Anyway, back to the fruit. It took a week to dry six bunches of bananas, 8lbs of oranges, 5lbs of pears, 6 pints of raspberries, and 3 pineapples.

When I finished the whole lot, this is what I ended up with:
10 quart jars! That's all! Now I know you're counting this and saying "Wait, I only see 9."  Well, that's because I didn't realize my pineapple jar was already down in the pantry when I took the 'group shot'.  I had dried the pineapple first, and the finished product looks like this:
Can you believe 3 pineapples fit in one quart jar?!
Ten quart jars takes up 2 rows lined up front-to-back on my pantry shelf.  It spans approximately 8" across the width of my shelf. The boxes from the oranges alone measures 10" on it's short end!  The bananas, pears, pineapples, oranges, and raspberries would have taken up the entire 36" shelf in my pantry cupboard if I had placed them in there whole. These jars take up less than a quarter of that space! Wow! I surpassed my goal of 1/3 by a long margin!

In spite of this newfound success, I am not going to scrap storing canned fruit.  Eating a reconstituted orange chip is not the same experience as eating a canned mandarin orange. However, these dried goods will be nice for cooking and making jam with should I ever need to tap into my long-term storage , and the dried raspberries and oranges taste kind of like a natural candy.  Yum!  I will keep canning fruit, meat, beans, and potatoes as storage space allows, but I will definitely make a point to add in a large complement of dried produce as well. Heck, a future experiment may include making various kinds of jerky!

So dust off your dehydrator and have fun with all the yummy produce in season right now. Oh-and do you like those cute little labels I am using on my jars? I found those at tipnut.com for free!  Check out their wide assortment of collected templates to embellish your pantry's goodies!

Blessings to you and your homestead,
Hillary At Home

Friday, April 8, 2011

Camp Hash Recipe With Canned Potatoes

Oops! I had forgotten to go back and type this in the last entry as I had promised. Here's our favorite breakfast while out camping:

1 Pint Canned Potatoes (cut into chunks)
1/2 lb bacon cut into bite-sized pieces (I cut mine with a pair of kitchen shears right into the pan at cooking time)
1/2 onion chopped (I chop it before leaving to go camping and put it in a container)
8 eggs ( I crack and scramble them in a container before leaving)

Brown the bacon and onion until cooked through.  Pour liquid off of potatoes and dump into pot.  Gently stir until mixed well.  Make a well in the middle of the pan and pour in eggs.  Scramble and cook.  Once cooked mix evenly in pan with the rest of ingredients.  This feeds our 2 adults and 3 small kiddos, so adjust as needed to feed your family.
Yum!!

Enjoy :)
Blessings,
Hillary At Home

Thursday, April 7, 2011

Homestead Experiment #19-Adventures in Canning


Well, it's been a crazy, productive few weeks here at our Alaskan homestead. Consequently, I haven't been able to write much.  Since I had the Great Pantry Cleanout, I have been working on replenishing my empty shelves of canned goods.  Rather than blog them all individually, I have decided to do it all in one shot. I will link you to the recipe and give you our family's review of the finished product.

First off, we decided to try canning citrus; more specifically oranges! I had never thought of canning any citrus prior to reading a blog entry on The Prudent Pantry, but figured it made sense. After all, all those little cans of mandarin oranges in the grocery aisle are not cheap!  I went to Costco and picked up a 10# box of navel oranges. We had been eating these for a few weeks already. They were as sweet as candy, and the peels were coming off easily, removing most of the pith with them.  (I wasn't nearly as worried about a little white pith showing through like Miss Heather at the Prudent Pantry.)


I had my trusty assistants (a.k.a my beautiful children) assisting with the peeling.  Then I separated the segments, cleaned off any 'stringies', ladled in my light syrup, and processed.
My little blue-eyed fruit peeler

Baby A and Baby B, now almost 8 years old and working hard for their Momma's pantry

A job well done!

Looked sweeter than they tasted...


Results
Appearance: They looked so pretty, and they definitely brighten up my pantry shelves.

Ease: Super easy project for the kiddos to help with.

Taste: Yeah, this is where this project scored pretty low.  For some reason, processing sweet oranges in sweet syrup made them really SOUR?? I'm sure all you Alton Brown-types could come up with a scientific explanation why. All I know is that they ended up tasting similar to grapefruit.  I'm not sure we'll attempt this one again, but if I do, we'll be sure to research for a different syrup solution!
****************************************************************
 Next, we moved on to a different food group: canning meat.   I have been wanting to try this ever since watching this video at Homestead-Acres.  I came across a great deal on super lean ground beef (93/7) for 1.99! I think that's a pretty good deal anywhere, but I know it's a great deal up here!

I checked the meat section in my canning books, and sure enough I found recipes for canning ground meat and sausage, but they all did it by shaping the meat into patties and baking it first.   Since I mainly use ground beef and sausage in browned,crumbled form, I liked the idea of boiling it in large batches and canning it like in the video above.

The Results:
Appearance: This is where this food definitely scores lower. Honestly, it looks like canned dog-food. You can see for yourself:
Not the winner of any canned-good beauty pageant!

Ease: Again, very easy. Made easier by boiling the meat in large batches like in the video referenced above. However, you do have to process meat in a pressure canner, so if you don't like/have one of these, it cannot be done safely.

Taste: Great! It tastes like it should. I didn't bother to try browning it again first to 'crisp' it up like she suggests in the video, so it was a little soft. However knowing that I can do that in the future, and knowing that it tasted good allows me to recommend this process!  Next up I have 5 whole chickens in the freezer waiting to share a pantry shelf with this ground beef. I'll blog about that when I get to actually doing it! lol
********************************************
Finally, I went ahead and canned a few items that I have already canned before. This included this pears with cinnamon sticks in light syrup, yummy cheese sauce (scroll down to 'Home Canned Cheese Sauce") and potatoes.  We are HUGE fans of canned potatoes. Not only are they the perfect consistency for potato salad (just rinse well to get the salt off), but they are perfect for camping! Since they're already cooked through, you just have to warm them through on the fire.  (I will include my favorite camp hash recipe below :)

The experiment with the potatoes came with the peeling aspect. I can up 40# at a time (2 big Costco bags of russets), and peeling them can be tedious. It's also too much for me to mess with blanching.  So, I decided to try adapting my trusty apple peeler/corer/slicer to see if it would work. The only thing I had to do was change it into just an apple peeler and get rid of the corer/slicer part.  That was easy enough. As you can see, the blade that has the circle for coring, and the edge for slicing was just held on by a wingnut. I removed it and Viola!
Next, we tried putting the potatoes on as they were. It turns out they were waaayyy too big! The weight of the spud, along with the curved shape, meant that they did not hit the peeling blade evenly. We tried peeling half and then flipping it around, but that didn't work so well. I just decided the best way was to cut them in half and then peel.

Afterwards, I went back with my paring knife and cut out eyes or missed peels. I was able to peel all 40# in 10 minutes or so! Cool eh?  Then I cut into salad-sized chunks, and processed as directed in the recipe. Again, you need a pressure cooker to safely process these jars.
*********************************

I am so thankful when I look at my pantry and see all that yummy, healthy food for my family! However I must admit, that I am even more eager for summer, and really excited to go camping!


Blessings to you and your homestead,
Hillary At Home

Wednesday, April 6, 2011

Guest Blogger: A Reader's Success Story!

Fellow homeschooling Mom, Theresa Jacobsen, left the following comment on my blog over at the Homeschool Channel.  I was inspired by her success and wanted to share it with you. I am pasting it below with her permission.

"Last spring ('10) I decided that I wanted to spend less time shopping....that was my goal....to shop no more than twice a month.  At 2.5-3 hrs a week grocery shopping, if I could reduce my trips to 2 a month ("others do it, why not me?", I asked), I would gain 5-6 hours 'back' in my month.  I really needed those hours and it seemed imprudent not to recover them if I could.

I reached my goal by summer and now easily shop only twice each month (I could shop once a month if I had an addt'l fridge...we drink a lot of milk and can't keep a cow/goat here in the burbs :o/ ....I do freeze milk) In the process, I've reduced my grocery budget by $125 each month (planning and buying in bulk/quantity really does save money) and I have a very well stocked pantry and freezer.  With the 'savings' over time, I've purchased a pressure canner and new extra large pot for water bath canning -and with more time at home instead of the store, I've learned to use them :o) , a FoodSaver, various other small items AND truck tires :o)  I also had extra money to set up several edible garden plots in my suburban back yard, although last yr's 'bounty' was mostly knowledge :-o  So now I have a $125 monthly grocery budget 'hedge' against inflation and I still manage to add to as well as rotate my pantry.

I make my own laundry detergent and fabric softener and easily have a yr's supply of those ingredients which readily fit on just one shelf in the cabinet above my washer....my entire laundry room couldn't contain a yr's supply of 'store bought'.  I've canned chicken and beef, sweet potatoes (purchased at .10 a lb), b.e. peas (the only 'abundance' my garden produced last yr), various soups and chili, strawberry jam, strawberry syrup and blueberries.  I'm having a blast, and my 20yr old daughter is learning alongside me....we're both having such fun.  I am "not afraid of snow", Prov 31, or immediate inflation as I "looketh well" to the ways of my household.  I make a pretty mean biscuit (my lovely daughter's is much better than mine) and we keep a large container of homemade 'bisquick' on hand.  I "strengtheneth" my arms while kneading my bread vs 'curling iron' in the gym (I used to do that).  I certainly "eateth not the bread of idleness" :o) and God has blessed me and my family.

Is keeping a pantry and looking after one's family unBiblical?  sigh, yawn; some women have their hair and nails 'done' on a weekly basis while their cupboards are bare. 

Anyway, that's the story behind my beginning a real pantry; maybe my comments will inspire someone?"

I don't know about you, but I am definitely encouraged! I love her insight in the next-to-last paragraph about many womens' priorities. That is definitely brain fodder to chew on!  I also had to literally LOL at her workout.  I said that very thing to someone the other day.  I get such a workout kneading my wheat bread dough, that it is foolish for me to give that up to justify getting a fancier mixer-and then go hit the elliptical for a total body workout!

More seriously though, I love how she reinforces the concept that the contentment and peace we feel after stocking our pantry is not born of pride or a lack of faith. Rather it is the fulfillment of all those promises made to a wise woman in the scriptures.  God has provided food and tools for our homes. If we utilize them, we are being resourceful, not rejecting.

Thank you again, Theresa, for taking the precious time to share that.  If anyone else has a Centsible success story, or testimony to share with other readers, please do! I think we all find comfort and motivation in other peoples' exhortations :-)

Blessings to you and your Homestead,
Hillary At Home

Monday, March 21, 2011

Wisely Creating A SPAM Free Pantry-Pt 4

Okay, so here is part 4 on your journey to having a great pantry for emergency reserves!  So far you've (hopefully) assessed why you want to have one, what meals you want to prepare, what kind of ingredients  you are going to buy, and where you are going to put it all. So, the last step in this equation is "How much?"  How do you know how much to buy?  All you math-resistant homesteaders, do not fear!  It's really quite simple, and as you'll see, it's a  very logical conclusion to this whole process.

Back in Part 2, you made a list of 14 meals you are going to serve in a rotation over a specified period of time.  (I chose 6 months for mine, so all of my samples are based on me serving each meal 13 times.)  Now for the next part, you'll either need a paper and pencil (and maybe a calculator), or a spreadsheet program like Open Office or Excel.  My choice is Open Office, and the default setting when you open up your sheet is 3 separate pages per sheet (bottom tabs to toggle between).  What you'll see here are the different pages I have to keep my 3 steps separated.

First off, I entered in my list of dishes.


Now on another tabbed page within that same worksheet, I made a list of all the ingredients I was going to need for these meals.


In column C,  I wrote how much of the ingredient is going to used for each meal. In column E, I simply took the amount in column C and multiplied it by 13 so I knew how much I would need to make the meals 13 times.  Now, on another sheet within this spreadsheet, I had taken an inventory of what I already had on hand. (See below for sample.)  So, in Column H of this page, I took the difference between the two numbers. For the items I was lacking, I put the number in bold font so it would really stand out.  Then, off to the right side I started a list of all those items so I could start dividing out when I was going to buy them.

Here is the inventory of what I already had on hand.  I also included the expiration dates of the items. Food that had recently expired, or was going to during the next year was in bold type so I knew it needed to be used up rather than included in my long-term storage.

As I had mentioned in Part 3,  I had figured out that I could spend $100 every two weeks toward food storage and emergency supplies.  I took my shopping list and knowing the approximate prices of the items on it, divided it up into two sub-lists that I would alternate shopping from.  I also added in some toiletries and paper products as well as the food items.  Also, if you are planning to can some goods to use in your pantry, do not forget about jars, lids, pectin, sugar, and special salts!

Then comes the exciting part of shopping and/or gardening and harvesting for your pantry. As I write this on my laptop, I have the pressure canner going with batches of potatoes.  Over the past 24 hours I've canned 12 jars of cheese sauce, butter, and spiced pears.  Maybe I'm weird, or maybe it's the inner-farm girl in me, but I get a "thrill" (to quote Anne Shirley) when I see my shelves lined with mason jars filled with yummy food. That feeling is a strange mix of contentedness, job satisfaction, and thankfulness to the Lord God above; the Giver of all good things.

I hope this 4 part series has been helpful to you in establishing your own pantry of stores.  I pray you never have to use it, but if we should, I pray it will be more than sufficient for your family.
Blessings to you and your homestead,
Hillary At Home

Wednesday, March 16, 2011

Wisely Creating a SPAM-Free Pantry (Pt. 3)

So, let's recap. On Monday I posted about why I have a well-stocked pantry, and yesterday I posted about how I figure out what to put in the pantry.  This post is to tell you how I took the list from yesterday and began the process of breaking it down into affordable portions to buy and store.  Before you ever get to the store, there is a little more assessment that needs to be done, so even though I thought I would be done with this series today, I am seeing that there will be one more post tomorrow with the final suggestions.

The next thing you probably need to do is figure out how much money you can set aside from each paycheck towards food storage.  For example, my DH gets paid twice a month.  We usually set aside any extras from our zero-based budget for debt pre-payment and/or savings.  Since we were trying to get out of debt, I did not want to stop our extra payments completely. So, I decided to take a little bit out of the extra payment and a little out of the food/grocery budget so that I had about $100/paycheck towards food supplies. Now $200/month may sound like a lot to those of you down south, but up here, $100 will not buy too much at all-especially if it includes shipping on cases of canned goods.

Now the next part is deciding what kind of goods you want to store.  In our case, we are active duty military who generally move quite frequently. (I say that hesitantly because we actually just found out that we're staying here for 4-5 more years!  Our average time at a station before was 1.5 years, but we will have stayed in this town for 8-9 if we finish out this next full billet. That is a true gift!) Because of the likelihood of having to move our food at some point, we decided the best plan for us is buying cases of canned goods that are specially preserved for extra-long shelf lives; usually 20-30 years! As long as the cans are un-opened, the movers will move them, versus miscellaneous coffee cans and bakery buckets of rice and beans.  Plus, as long as the cans are kept dry, I don't have to worry about critters, bugs, and rust.
 
Since shipping is such a huge factor up here (many of the emergency suppliers won't even ship to us at all), we bought what we could through the LDS Distribution Center store online. This was mainly rice, pinto beans, quick oats, and wheat berries.  Then the local LDS church also does an annual co-op order through Walton Feed to get other supplies barged up here.  They were kind enough to let us tag onto that the past two years.  If you live in a place with UPS and Fedex ground services, you will have many more options.  Two other popular suppliers are Emergency Essentials and MRE Depot.  Please note that I have not ordered through Emergency Essentials, but my friends have without any problems. I have ordered through MRE Depot, but now they are pickier about what they will ship to AK. Apparently sending 4 cases of canned sugar to me made them review their shipping policies. Drat! However, the one experience I had was fine and I would recommend them to anyone else.

Other storage methods besides canned goods are 5 gallon food grade buckets with/without oxygen absorbers and gamma lids, mylar pouches (watch for rodents with these!), vacuum sealing bags and jars (i.e. Foodsavers), and the afore mentioned coffee cans and bakery buckets (although those are only good for short-term storage).  I do have a couple of sealed 5 gallon buckets of wheat berries, old fashioned oats, and honey that I ordered through our last Walton's order, but mostly what I have are cases of cans that I stack in the crawlspace under our stairs.  That was another benefit of standard-sized, stackable cases; easier storage. Some people use the spaces under beds for this storage, or designate a side of a child's closet to stack them.
Our long-term storage items


For the most part, these cases have been a great solution for us, but there are still irregularly shaped goods that I purchase from traditional stores. Most do not have such a long shelf-life. Plus, I am also stocking my own home-canned items. How do I store all of those?


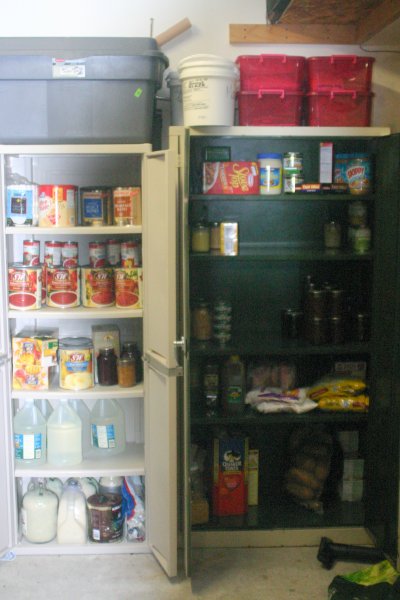
For bulk items that I want to divide and use within a year (20# bags of flour, sugar, rice, etc) I do use those bakery buckets, clean coffee cans, and even some really large wine jugs that I got at the thrift store (great for rice!).  I buy bay leaves in the bulk spice section of Safeway or Fred Meyers (pennies for a large baggie full verses what you pay for the little bottle on the shelf in the spice aisle!) and layer one in every few inches as I'm pouring.  These help to keep the food tasting fresh as well them being a repellent to most bugs.  For the large cans of tomato sauce, coffee, jugs of powdered creamer, shortening, cooking oils, etc. I keep those in upright cabinets with doors, down in our garage.  (Note: If you live down south, you need to be mindful of overly hot and/or humid garages. For those up north, try to keep it in the 40's to avoid freezing.)  I write the expiration dates on the cans with a sharpie marker in big numbers to make it easier to rotate the goods. I have begun using Wendy Dewitt's method of taking stock of these goods at the beginning of each year and just pulling out the ones that expire during that calendar year. I bring them upstairs to my cupboard for regular use and just make a list of what needs to be replenished for the downstairs cache. That way I'm not having to worry about a month by month rotation.  When I buy these goods, I do look through several cans to see if I can find the one with the furthest sell-by date.  Often I can find ones that are a full year out from their shelf-mates!


The cabinet on the right was a cast-off from an office building. I loved using it as a pantry; so much so that I bought the plastic version at the store for about $80. While not as sturdy or big, the two together make a great storage solution for a pantry-less house.  (The empty shelves are a result of us eating through a lot of canned goods in preparation for our transfer this summer. Now that we're not moving, we need to replenish!)

The blue tote on the top left has cans of coffee that all have the same expiration date 2 years from now. I just wrote the date on the tote label. The pink containers on the top left contain hard-to-stack items like ramen noodles, spaghetti, bags of dried beans, etc.
These tubs run about $4 a piece, but are great for stacking loose bags! Plus, stacking them on top of the cabinet frees up shelf space for jars and cans.
Yes, there is a use for all those old glass jugs and coffee cans-Rice!

See how I wrote the expiration dates with a sharpie? MUCH easier to see at a glance!
If you have the space, many people like to use the Self Reliance shelving units with the sloping slots for canned goods.  Personally, I wanted something more discreet. Besides, most canned goods last better in darker storage, and I had issues with the thought of my mason jars rolling and smacking into each other.

With all of my food products, I have tried to keep it as shelf-stable as possible, meaning that I am trying to get all my food in forms that do not need refrigeration or freezing.  For example, we have learned how to can butter and yummy cheese sauce (scroll down on the link for the cheese sauce).  We tried canning the hard cheese as listed on the same site, but didn't like the result. It's okay for grating but had a gritty texture. One of our future homestead experiments we're getting ready for is waxing cheese, so stay tuned!

As for meat products, we currently have cans of freeze-dried, flavored TVP crumbles, tuna, and canned salmon. However, I am gearing up to start canning ground beef and chicken that I stocked up on during a recent sale. Currently it's all in the meat freezer, but it's getting ready to go on the empty shelves in my pantry; another homestead experiment to check back on. :)

As for paper products, I have those stashed all over.  We were fortunate enough to receive some large shelving units from an old museum, and now they run along the back wall of our garage. I have toilet paper and paper towels stored on a section of that.  Our goal is to have the overhead shelves in our garage cleaned off in the next few weeks. At that point, I will probably move the paper products up there in some sort of plastic bag or tub.  Don't overlook the possibility of overhead storage in wasted space, and you don't need to buy the expensive shelving kits (although we have in the past, and they are convenient.) As you can see, cheap primitive storage with 1/4" pressboard and plumber's strap is very  effective for storing seldom-used items!  This is shelving that has been left for us by our landlord, but we are planning to expand it to wrap around other walls in the garage.

The packages of paper products that we are currently working out of is divided up between the bathroom cabinets and the remainders stashed in that crawl space under the stairs for easier access.  Detergent ingredients and 'Health and Beauty' items (shampoos, deodorants, bars of soap, feminine hygiene, toothpaste) are stored in the bathroom cabinet and the overhead cabinet in my laundry room/bathroom.  I also scored a great deal on garbage bags recently on the clearance aisle of the home-improvement store. I have just stacked those on top of my buckets in the crawl space, but will probably work them into the overhead garage shelving later.
Stashing cleaning liquids behind the towels!

 So, I feel that this is a good place to stop this entry.  Your homework?

*Take stock of what space you have for storage, and what kind of food storage will best fit your lifestyle.

*Look at your budget and pre-determine an amount that you can use towards this endeavor. Do not overlook the cost of jars, lids, and shipping if applicable. Go on-line and search for shipping prices at various vendors, and maybe even take a trip to your local Sam's or Costco to see what they have to offer.

*Peruse great sites like Becky's Farm Life and the Homestead-Acres Youtube channel. Whew-that's a lot of homework, but hopefully you will find it kind of fun and exciting.

Next I will write about converting your ingredients list into an actual shopping list. 

Until then, blessings to you and your homestead,
Hillary At Home

Tuesday, March 15, 2011

Wisely Stocking A SPAM-Free Pantry (Pt 2)


Howdy Homesteaders!

So, yesterday I wrote about my reasoning behind having a well stocked pantry. Today I want to share with you the how's of building said pantry! When I first thought of doing this, I got overwhelmed at the mental list I had going: veggies, fruits, sauces, soups, noodles...oh and what about shampoos, detergents, deodorants....which led to cleaning supplies, paper products, OH MY! I realized right away that if I didn't get a systematic process going I was going to end up with one of two results: a)I was going to end up obsessed with building a sporadic inventory, or b) I would be overwhelmed and just quit. Knowing my type-A tendencies, it probably would have ended up the first scenario, and I would have become anxious and panicky because of not having a game-plan. Yes, I admit that I am a recipe follower, not a 'pinch of this, dash of that' kinda gal. Thankfully, a dear friend introduced me to a fabulous plan that really helped me develop a process that I could build on incrementally as my budget and space allowed.

First off, I watched a series of youtube videos by Wendy Dewitt. While I don't necessarily agree with a lot of her theology, I will wholeheartedly say that this lady has got food storage down! Each video is about 8 minutes for a total of an hour or so, and I will encourage you to watch them all as she has great tips for using vacuum sealers, solar ovens, etc. As for the food storage,here's the plan in a nutshell: Take 14 index cards and write the name of a dinner recipe on one side of each. These will be your 14 meals that you will have once every two weeks. Now, on the back of each card write the ingredients and amount that you need for each meal.  Simple, right? Simple but brililant!

Personally, I tried to pick meals that had the following criteria:
1-They needed to be hearty and filling
2-(As much as possible) They needed to be complete meals (have protein, veggies, and starch included)
3-They needed to be fairly inexpensive
4-They needed little to no perishable ingredients, and preferably overlap ingredients with other recipes..

So, after all that, here is my list:

1. Garlic Spaghetti
2.Spaghetti with meat marinara
3.Chicken and Dumplings
4.Vegetable Beef and Mac soup
5.White Chicken Chili
6.Shepherd's Pie
7.Potato Chowder
8.Salmon (or Tuna) Noodle Casserole
9.Ramen Noodle Stir Fry with veggies
10.Swedish Meat balls (or meat sauce) over egg noodles or rice
11.Japanese Rice
12.Red Beans and Rice
13. Rice Pizza Casserole
14.Tomato Chicken Rice Casserole

Now, I do not necessarily have the money or space to build a one-year supply of food stores. Instead, my goal was to aim for a 6 month supply. So, I took the ingredients and multiplied by 13, figuring we would eat that meal 13 times over 6 months. As for breakfast, I planned that we will probably eat oatmeal and eggs from our chickens. I thought it was very interesting that Mrs. Dewitt took the time to research historical eating patterns during depressions and famines. As she noted, people tended to eat a large breakfast, a large lunch (dinner), and then a lighter supper. I my case I'm planning for an evening meal of bread and jelly with a beverage (ie tea, coffee, milk, etc). So, on 2 more cards, I figured out how much oatmeal, milk, cinnamon, molasses (to make brown sugar), sugar, and raisins I would need to feed my family bowls of oatmeal each day, as well as the ingredients I would need to make a loaf of bread each day along with canned butter. We make cases of jelly every summer with local berries regardless-although I did figure I would need to plan on sugar and pectin for that.  I also planned on cake ingredients, powdered sugar (for icing), etc. for birthdays and special occasions.

Now, this is quite a bit of homework to do, and may take a full evening or two-especially if you're not typically a menu planner. To avoid overwhelming you at this point, I'm going to stop my entry here for today. Next time I will show you how I took this ingredient list and broke it down into a manageable shopping list that was not scary and kept me from wandering store aisles for hours at a time. In the meantime, start working on your recipe cards.

I want to encourage you-YOU CAN DO THIS! It may sound weird now, but as you start to see your pantry shelves fill up with healthy food and supplies, there is a feeling of excitement and thankfulness. I pray that our families never have to use these supplies, but if you do need them, what a gift it will be!!

Until next time, blessings to you and your homestead,
Hillary At Home